Things are changing a bit for me and my blog and this will be the last post here at Metal Musing for the time being. You can catch me over on my new website complete with a brand new blog at erinaustindesign.com.
In the future, I envision using this space to focus more on the work of other artists and the craft of metalsmithing.
Thanks so much to all of you that have followed along with me here. If you are just happening upon this blog, I hope that you will take a look around for a bit of background on me and my work.
As always and with much gratitude, Thanks for reading!
I've been experimenting with stop motion animation again!
Bringing ideas and sketches to life through metalsmithing has always been one of my favorite things about the job with the individual parts and pieces being a close second. Now they are both contending with bringing them to life through animation for number one!
I'd love to hear what the very best thing about your job is so let me know in the comments!
When I'm not at my bench I'm often in my garden so it's no surprise that my work often features botanical themes. This year I've added a few new things to the garden including chamomile
cosmos
and Shasta daisies.
I pruned back the butterfly bush and was rewarded with full blooms
and an increase in our usual visitors including this stunning swallowtail butterfly.
I
I let the crocosmia spread wherever it liked.
And worked on continuing to layer colors and textures in the borders.
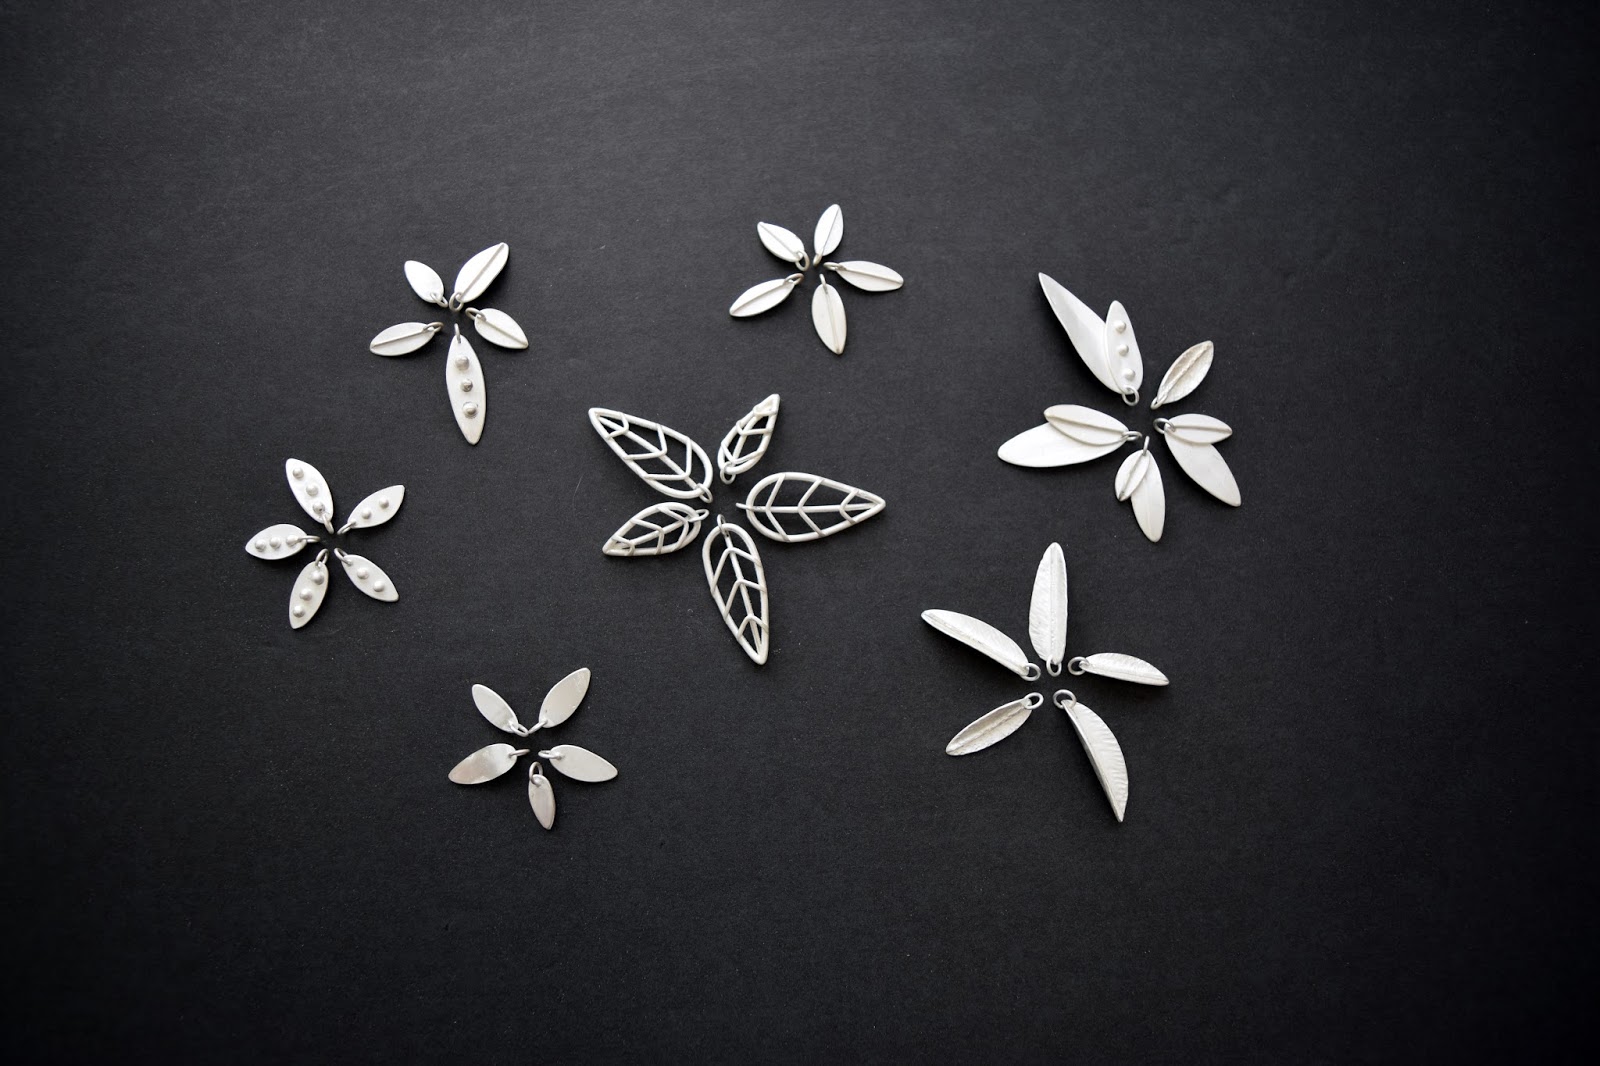
With so much inspiration it's hard to know where to start. Right now I'm working on a series of leaf inspired pieces just in time for fall. Here's a sneak peak from a new stop animation:
Everyone knows it's all about the layers in Humboldt county, especially near the coast. The weather can change from hour to hour and it's best to be prepared. I must own at least 15 sweaters and nearly as many scarves and I'm pretty sure it's the same for about 90% of the population here, so it's a wonder I've never created shawl sticks before.
When the North Coast Knittery, an incredibly charming yarn shop in Old Town, asked me to create a selection for their store I was happy to get to work. I let my imagination run wild and pulled from the themes of my existing work, botanicals, geometric forms, and a variety of textures to create a unique group of accessories in sterling silver, copper, and brass.
You can get your hands on one of these at 407 2nd Street in Old Town Eureka or from the North Coast Knittery website.
When the parts and pieces of the Seaside Collection come together it's magic!
A sterling silver nautilus and sea urchin pair up with a tranquil blue larimar stone, while a star fish and conch shell gather around an amazonite and fossilized coral, resulting in two one of a kind pendants that will have you day dreaming about white sand beaches and crashing waves in no time.
Black onyx, aventurine, and mother of pearl cabochons nestle in with sterling silver nautiluses to bring a tide pool treasure to the palm (or top) of you hand.
Tiny sea creatures dangling from sterling silver chain will remind you of exploring your favorite tide pool or reef.
And a stark white slice of shell, pale green aventurine stone, and a tiny silver nautilus drum up the long sunny days of summer spent beach-combing and lying in the sun.
When I'm creating new work for the Seaside Collection I think a lot about how I spend my time at the beach whether it be peering into tide-pools taking care not the slip on the rocks or disrupt the abundant life there, slowly strolling up and down the beach with my jeans rolled up above my ankles and waves swirling around my feet as I search for washed up treasures, or laying on the warm sand with a great book with bright blue waters of the Pacific in the distance, the crashing waves, call of the gulls, and warm summer sun, gently lulling me to sleep.
With these moments at the forefront of my mind I select gemstones with colors that mimic wet rocks, warm sand, deep sunsets, cool blue waters, and endless blue sky, and pair them with ocean fossils, and beach-combing finds like beach pottery, sea glass, and shells.
Carnelian, sunstone, and pyrite reflect the rich warmth of a summer sunset.
Amazonite, aventurine, and larimar mirror cool blue ocean waters and clear summer skies.
Fossilized ammonite, sea urchin, and coral bring to mind white sand beaches and rocky tide pools.
Ocean pottery, sea glass, and beach pebbles call up the fun of discovery,
as well as the power of the surf that tumbled them smooth.
I always look forward to time I can get out to the beach and recharge for a bit. The weather here in Northern California isn't always super cooperative, but even a foggy afternoon can be incredibly beautiful.
Trinidad, Ca
There is always something to discover along the shore line or in the tide-pools.
Trinidad Tide-pools
Incredibly, you will often find yourself on a long open stretch without another person in sight. The perfect environment for introspection.
And occasionally the Pacific will bring up something that it's been working on for a very long time.
Samoa Beach, Ca
When I'm back at the bench, I take all that ocean inspiration and use it to create one of a kind pieces that I hope bring a little bit of seaside charm into everyday life.
Unless you've been living off the grid for some time, you probably know that layering necklaces are pretty popular these days. I'm more of a one piece at a time kind of gal, but I can definitely see the appeal. Who doesn't want to wear all of their favorite pieces at the same time? I mean that's what we did as children right? When we were more able to be ourselves, from our refusal to eat what we deemed yucky, to our vibrant fashion sense, we put it all out there. We layered those necklaces, and if you were anything like me, you may or may not have uttered "I pity the fool" at the same time. The best part about layering necklaces is that just like stacking rings there really are no rules, so the possibilities are endless!
A few necklace layering tips:
Vary their lengths. You don't want any of the pieces covered by another. That would kind of defeat the purpose.
Maybe don't go overboard. This isn't a hard and fast rule, you are of course free to layer as many pieces as you like, but I think the look is most successful with two to 5 pieces max. A caveat here would be layering up a bunch of different chains or beaded necklaces to mimic one big statement piece. Whatever you decide, have fun!
Mix it up. While layering pieces that have the same size, metal, and finish - say dainty high polished silver pieces - looks great, so does mixing metals, sizes and finishes. Try heavily oxidized silver pieces with high polished gold, or several thin chains with a longer and larger pendant. Again, you make the rules, so mix and match to your hearts delight.
It's not always a good idea to wear necklaces. It's safety time again! Keep in mind what you'll be doing before you slip on that necklace. While a single thin necklace with a safety link might break if it becomes tangled in machinery or on a tree branch (hey, you could be out there climbing trees, it's fun) a large grouping of necklaces is less likely to give, which could result in a nasty situation. In fact, it's best to remove all jewelry when operating machinery, doing any heavy lifting (rings), or when in situations where tangling could be a problem.
Stacking rings are so versatile and fun. They come in a variety of shapes, sizes, and metals so it's pretty easy to create a collection for any style. What's better is that they mix and match so well that the possibilities are really endless.
A few stacking ring tips:
The more you stack the larger the size you'll need. If you wear a size 7 a few thin stacking rings in a size seven will likely fit fine. However, if you plan on stacking more than three thin bands or adding some wider bands to the mix chances are you will need to increase the size as you increase the width/number of bands. As far as I know there is not an exact rule of thumb for this increase, but plan on adding 1/4 to 1/2 size for rings that measure more than 4mm wide when stacked together and continue to increase the size as necessary. If you are a multi finger ring wearer (say that 10 times real fast!) you can experiment across the sizes you already own. Otherwise, it's best to sized by a jeweler before purchasing.
Solitaire rings might spin on your finger. Stacking rings with larger stones or decorative elements that are wider than their band will often spin on your finger when worn alone, especially if your knuckles are wider than where the ring will lay on the finger. Luckily, stacking them with other bands often alleviates this problem or at least makes it less noticeable.
There are no rules. There is no right or wrong way to stack rings. Well, maybe try to avoid so many rings that your finger wont bend, but then again, if you don't need to bend your finger...
It's not always a good idea to wear rings. You've probably already heard that you shouldn't wash your hands with your rings on. I ignore this rule most of the time, but if you have sensitive skin it's a good idea to take them off so soap isn't trapped underneath them. It's also not a great idea to wear rings when you're operating any type of rotating machinery, actually, it's a terrible idea, so don't do it. Heavy lifting/gripping is also out for ring wearers. Finally, pay attention to salt intake, dehydration, and weight gain all of which can lead to painful and anxiety inducing experiences if a ring becomes stuck on a swelling finger.
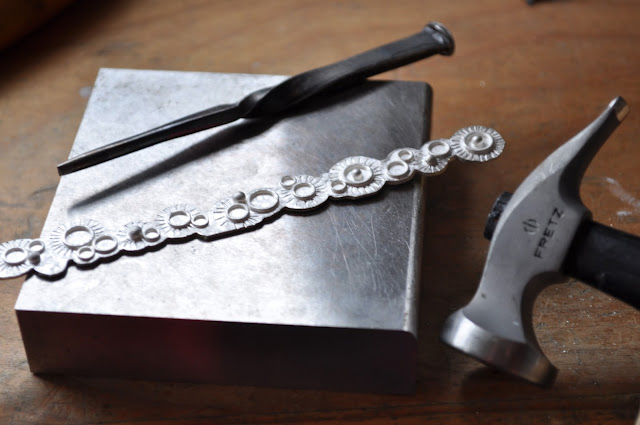
I recently hung out at Belle Starr in Eureka for Arts Alive, an art event on the first Saturday of every month here in Eureka, and took along this awesome little collection of hand tools to do some show and tell about my process. People loved it. I gotta say, I'm a little in love with the display myself. It's been weeks and I've still not returned these tools to the studio. Granted, I have duplicates of some of them, but that file is my go to file, so... I may need to buy a new file.Anyway, since there was so much interest in person I thought it would be fun to do a quick show and tell here about the tools I use most often.
Starting at the left we have the jewelers saw. Arguably the most important tool I own. After a pattern has been transferred it's often the first tool to touch sheet metal and the result can be dramatic, moving from an open canvas to a refined form as seen here with these floral elements from the Botanical Collection.
Next in line is the file. The one pictured above is a barrette file and only has teeth on one side. It's edges come to a point allowing me to really get into tight corners without affecting the adjacent sides. Files of several shapes and sizes are used to refine a form, smoothing its edges, and creating more dimension through beveling. These ocean creatures from the Seaside Collection have been stamped, cut out, and filed.
To the right of the file is a chasing hammer. The flat face of this hammer is used to strike other tools, like center punches that are used to create divots for drilling holes, or texturing tools that are used to add detail. The opposite end of this hammer can also be used to add texture. In the image below I used the chasing hammer with a line stamp to add detail to an Orbital cuff.
The hammer at the far right is a forming hammer. I use it along with a steel block, anvil, or stake to change the overall shape of a piece resulting in forms that are more 3 dimensional in nature. It can also be used to add texture to a piece as seen in the hammered and formed brass earrings below.
These are just a few of the many tools I use on a daily basis and I have to say... I love my job! Thanks for reading!
For the past year or so I've been collaborating with local glass artist Merry Coor on pendants and rings that expand her stunning collection of memorial jewelry.
The glass cabochons are created with cremation ashes swirling throughout resulting in pieces that call to mind crashing waves and rotating galaxies, each one as unique and beautiful as the loved one remembered. When the cabochons are complete Merry hands them off to me and I create the sterling silver settings.
It has been an honor to to be a part of their creation, to help bring some small comfort to those who have experienced loss. As I work on each piece I try to focus on those that are important in my own life, to challenge myself to be a bit more present, to remember those who have passed, and to contemplate the great cycle of which we are all part.
To learn more about these unique memorial pieces visit the Ash Beads website.
“I know that I am mortal by nature, and ephemeral; but when I trace at my pleasure the windings to and fro of the heavenly bodies I no longer touch the earth with my feet: I stand in the presence of Zeus himself and take my fill of ambrosia” ― Ptolemy, Ptolemy's Almagest
I love this quote. It completely captures how I feel gazing up at the night sky, thinking about the vast universe, how small I am, how incomprehensible it is, yet at the same time how powerful the mind is that we seek to understand, that we are part of it. Amazing.
I was recently asked how I choose my stones and regrettably, my answer focused on the buying aspects: attending gem fairs, visits to the jewelry district, scouring the local rock shops. What I wish I had focused on was how the stones I choose fit into my work.
Each of my collections focuses on a few specific stones that I attempt to connect to the themes of my work. When I'm creating something for the Orbital Collection, like these ocean jasper pieces, I'm aiming to find stones that resemble galaxies, nebula, and gaseous planets.
With other Orbital pieces, like these lapis and pyrite pendants, I'm looking to evoke the night sky, at times obstructed by whispy clouds and at others clear and crisp the first twinkling stars showing themselves.
Labradorite, prehnite, or moonstone make their appearance as I'm imagining shards of freezing comets rushing past foreign landscapes or the glow of the moon as its reflection dances on water.
So the next time someone asks how I choose my stones I think I might tell them that I'm looking for the feeling that lives somewhere between discovery and imagination. Thanks for reading!